 |

|
|

|
Using MS MapPoint in PowerBuilderWhy should you use GIS (Geographic Information System) data in PowerBuilder? You can plan a route for a service technician or a sales person. You can track the positions of the trucks delivering goods and it might allow you to direct a truck to an additional pick up close to its route. You can print driving directions when heading to an unknown place.
The following article demonstrates how to use the Microsoft MapPoint control from within PowerBuilder to perform such operations. The MapPoint Control
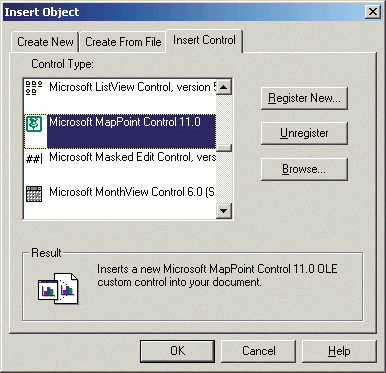
Click on the image to view the full figure. To place the control on a window, use the menu item Insert Control -> OLE. In the Insert Object dialog choose the Insert Control tab, select the Microsoft MapPoint Control, place it on the window, and name it ole_Map (see Figure 2).
Click on the image to view the full figure. With two lines of code, the MapPoint control is ready to use. The ioo_Map variable is an instance variable of type oleobject and is saved for further interaction with the map. Load the map in the open event of the window: // 1 = North America, 2 = Europe
Unload the map in the close event of the window: ole_Map.Object.CloseMap() The control has some default behavior that you can use or overwrite. The right-mouse button menu allows zooming, creating routes, exporting to Excel, and showing information about a pushpin. With the left-mouse button it's possible to scroll, select an area to zoom in, and move pushpins around, something you usually don't want to happen. The mouse wheel is used for zooming. The MapPoint control provides various events for user interaction and notifications of state changes. The most important events to interact with the map are: beforeclick: This event occurs after you click on the map but before MapPoint processes the action. It's useful to display some information about clicked object(s).
Useful notification events are: afterredraw: This event occurs after MapPoint has finished repainting the map on the screen. This can be used to show or hide additional information.
Programming the Control
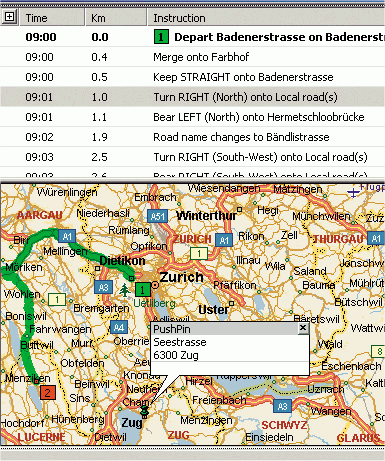
The route object is used to calculate a route between pushpins. It contains important information about the route such as distance, driving time, and directions. On the MapPoint control there's only one active route at a time, referenced by the property ActiveRoute. To calculate a route you have to add waypoints to the route. Listing 2 is a continuation of Listing 1. I add the main station to the map using the same steps as in Listing 1 when adding the office. With the property ActiveRoute I get the route object from the map, reset the route with the method Clear, and get the waypoints collection from it. In the next step I add the pushpins to the waypoints and call the route's method Calculate. The route will be calculated and the event routeaftercalculate is fired after the calculation. From this route I get the direction information by looping through the directions collection. I add the direction instruction to a string, placing each entry on a new line. At the end I display the distance and the direction information. Pushpins are grouped in datasets. When you add a pushpin to the map it's added to the "My Pushpins" dataset. However, you can define your own datasets that can be used to manipulate groups of pushpins. In Listing 3 I create a dataset called "MyTour" using the method AddPushpinSet. (Listings 3–6 can be downloaded from www.sys-con.com/pbdj/sourcec.cfm.) Adding pushpins to this set is done with MoveTo. In the last step, I change all the pushpin symbols of the new dataset at once to a large red dot using the property symbol of the dataset. You can overwrite the default behavior in some events. As I mentioned before, you don't want the user to move a pushpin from one address to another as it still contains the information about the original address. To prevent this you have to place some code in the beforeclick event. The code in Listing 4 shows a possible handling for the beforeclick event. Arguments of this event are the clicked mouse button; the state of the SHIFT, CTRL, and ALT keys; the X and Y coordinates of the mouse; and the boolean cancel passed by reference. Cancel is false by default; when set to true the default behavior of the event is suppressed. Using the method ObjectsFromPoint with the mouse coordinates returns a collection of locations and pushpins located at the mouse pointer. I loop through the collection to find the pushpins (if the zoom factor is small, they might be located on top of each other). To distinguish between locations and pushpins I use the property parent. The parent of a location is the map, whereas the parent of a pushpin is a dataset. If the user clicks with the right-mouse button on one or more pushpins, open your own right-mouse button menu and prevent the default menu from popping up by setting the variable cancel to true. If the user clicks with the left-mouse button on one pushpin, you might show some information about it. Preventing the default behavior of the left-mouse button in the beforeclick might be a good idea anyway as this will prevent having to move around pushpins. OLE Automation with MapPoint
The functions for creating and calculating routes are the same for the control. The only difference is that calling the calculate method of the route should be placed within a TRY … CATCH statement to catch a possible runtime error (see Listing 6). A runtime error could be generated when a location on your route is located in a pedestrian area. Conclusion
First published in PBDJ at http://www.sys-con.com/pbdj/article.cfm?id=598, used with permission.
Author: Arthur Hefti Email: arthur(AT)catsoft.ch URL: http://www.catsoft.ch Arthur Hefti is the CEO of CATsoft Development GmbH in Zurich. He has been a PowerBuilder developer for 10 years and has taught dozens of PowerBuilder training classes. He and his team frequently create custom-made client/server and Web software with PowerBuilder and JBoss using XML, Web Services, and encryption.
|
|
||||||||||||||||||||||||||||||||||||||||||||||||||||||||||||||||||
|
|
||||||||||||||||||||||||||||||||||||||||||||||||||||||||||||||||||||


