 |

|
|

|
MapPoint Get MSAs Add-inLearn how to create a MapPoint add-in by using the MapPoint object model and Microsoft Visual Basic .NET. With the add-in, users can query Pushpin sets to find out if any of the Pushpins are located within Metropolitan Statistical Areas (MSAs). The add-in then displays the query results in a Microsoft Excel workbook.
Click here to download the code sample for this article. Contents Introduction IntroductionA Metropolitan Statistical Area (MSA) is a geographical area, defined by the federal Office of Management and Budget (OMB), that represents the metropolitan area of a city. In most of the United States, an MSA consists of a county or a group of counties. MSA information can be useful in business planning, and the Get MSAs add-in provides an easy way for MapPoint users to extract and use the MSA information that is built into MapPoint. Suppose you have a list of 20,000 potential customers and want to figure out which ones to target for a sales campaign. You can import your customer list into MapPoint, and then use the Get MSAs add-in to query your Pushpin set and create a list of customers that are located within MSAs. You can then target your sales efforts to customers located in specific MSAs, based on demographic data provided by MapPoint.
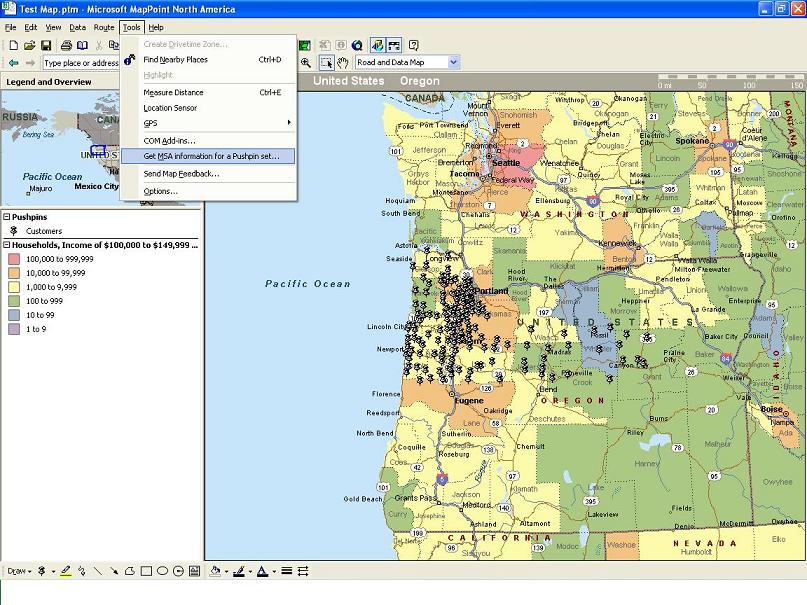
Click on the thumbnail to view the full image. The Get MSAs add-in was written in Microsoft Visual Basic .NET using the MapPoint object model and the Visual Studio Add-in Wizard. The add-in adds a dialog box in MapPoint in which you select the Pushpin set that you want to query. When you click OK, the add-in uses the MapPoint ObjectsFromPoint method to check each Pushpin to determine if it has a location type of MSA. If it does, the name of the Pushpin and the name of the MSA are exported to an Excel workbook. When the search is complete, a dialog box displays how many Pushpins were queried and how many are in MSAs, and the list of results is displayed in an open Excel workbook.

Click on the thumbnail to view the full image. This article first describes how to install and run the completed add-in, which is provided. The article then walks you through the steps necessary to create a MapPoint add-in and use the ObjectsFromPoint method. Although the Get MSAs add-in uses the ObjectsFromPoint method to determine whether a location type of MSA is associated with each Pushpin, you can use the ObjectsFromPoint method to return any of the location information objects available in MapPoint, such as city, state, ZIP Code, or country. This article assumes that you are familiar with Visual Basic .NET and MapPoint. For more information about programming with the MapPoint object model, see About Programming with MapPoint. For more information about MSAs and other types of standard geographical divisions that MapPoint supports, see Using Standard Geographic Codes to Import Data into MapPoint. Installing and Running the Add-inTo run the add-in or use the sample code, you must have the following software installed on your computer:
To install the add-in
Note You can uninstall the add-in by using Add or Remove Programs in Control Panel. To run the add-in
Creating the MapPoint Get MSAs Add-inThis section is divided into two parts: the first part describes how to create the add-in in Visual Studio .NET. The second part describes how to use the ObjectsFromPoint method to get MSA information from a Pushpin set and send it to Excel. Creating a MapPoint Add-inCreating the add-in consists of three main steps:
To create the framework for the add-in
To add a menu item and clean-up code The Add-in wizard creates the file Connect.vb to implement the methods of the IDTExtensibility2 interface that are necessary for an add-in. The Connect class in Connect.vb contains code to expose the add-in to the end user and clean up after the application runs.
Public Class Connect

    Implements Extensibility.IDTExtensibility2

    Dim applicationObject As Object
    Dim addInInstance As Object

    Protected Friend Shared MPApp As MapPoint.Application

Public Sub OnBeginShutdown(ByRef custom As System.Array) Implements Extensibility.IDTExtensibility2.OnBeginShutdown
    End Sub

    Public Sub OnAddInsUpdate(ByRef custom As System.Array) Implements Extensibility.IDTExtensibility2.OnAddInsUpdate
    End Sub

    Public Sub OnStartupComplete(ByRef custom As System.Array) Implements Extensibility.IDTExtensibility2.OnStartupComplete
    End Sub
    Private Sub ReleaseObject(ByVal MPApp As Object)
        Try
            System.Runtime.InteropServices.Marshal.ReleaseComObject(MPApp)
        Catch

        Finally
            MPApp = Nothing
        End Try
    End Sub
    Public Sub OnDisconnection(ByVal RemoveMode As Extensibility.ext_DisconnectMode, ByRef custom As System.Array) Implements Extensibility.IDTExtensibility2.OnDisconnection
        On Error Resume Next
        If RemoveMode <> Extensibility.ext_DisconnectMode.ext_dm_HostShutdown Then _
           Call OnBeginShutdown(custom)
        ReleaseObject(MPApp)
    End Sub
    Public Sub OnConnection(ByVal application As Object, ByVal connectMode As Extensibility.ext_ConnectMode, ByVal addInInst As Object, ByRef custom As System.Array) Implements Extensibility.IDTExtensibility2.OnConnection
        applicationObject = application
        addInInstance = addInInst
        MPApp = CType(application, MapPoint.Application)
        ' Add an item to the Tools menu in MapPoint.
        MPApp.AddCommand("Get &MSA information for a Pushpin set...", "ShowAddInForm", Me)

    End Sub
    Public Sub ShowAddInForm()
        Dim FormAddIn As New MapPointGetMSAs.FormMSAQuery
        FormAddIn.ShowDialog()
    End Sub

End Class
To add the user interface and core functionality
When you launch MapPoint, your add-in will be ready to go on the Tools menu. Using the ObjectsFromPoint MethodThe ObjectsFromPoint method queries the x and y coordinates of a Pushpin and returns all location types that are associated with that point on the map; latitude and longitude, city, country, county, ZIP Code, MSA, and so on. If the Pushpin is not in an MSA, that location type, whose value is 10, is not returned by the query. For more information about MapPoint location types, see the MapPoint Help topic GeoShowDataBy values. The example code in this section is divided into four main steps:
Getting the MapPoint Application Object and Pushpin SetsWe'll begin by declaring the variables we'll need. Next, we'll load the form, getting the active MapPoint Application object and map. We'll then populate the combo box on the form with the Pushpin sets on the active map. Finally, we'll use the Click event of the ButtonCreateList button to get the Pushpin set the user chose from the combo box. 'Declare variables.
Dim MPApp As MapPoint.Application
Dim Map As MapPoint.Map
Dim Pins As MapPoint.DataSet
Dim Pin As MapPoint.Pushpin
Dim FindResults As MapPoint.FindResults
Dim Result As Object
Dim DSs As MapPoint.DataSets
Dim DS As MapPoint.DataSet
Dim Center As MapPoint.Location
Dim Style As MapPoint.GeoMapStyle
Dim ExcelApp As New Excel.Application
Dim ExcelSheet As Excel.Worksheet
Dim Row, Alt, n As Integer
Dim x, y As Long
Dim MSA, City, PinName, SetName As String
Private Sub FormGetMSAs_Load(ByVal sender As System.Object, ByVal e As System.EventArgs) Handles MyBase.Load
'Get the active application, map, and data sets.
MPApp = GetObject(, "MapPoint.Application")
MPApp.UserControl = True
Map = MPApp.ActiveMap
DSs = MPApp.ActiveMap.DataSets
'Position the add-in form on the screen.
Me.Left = MPApp.Left + 50
Me.Top = MPApp.Top + 50
'Populate the drop-down list with the names of the Pushpin sets on the
'current map.
'If none of the data sets are Pushpin sets or if there are no
'data sets, inform the user.
If DSs.Count <> 0 Then
For Each DS In DSs
If DS.DataMapType = MapPoint.GeoDataMapType.geoDataMapTypePushpin Then
ComboBoxDataSets.Items.Add(DS.Name)
Else
End If
If ComboBoxDataSets.Items.Count = 0 Then
MsgBox("None of the data sets on the map are Pushpin sets. Convert the data set that you want to query to a Pushpin set (non-aggregated or point data), and then run the Get MSAs tool again.", MsgBoxStyle.ApplicationModal, "Get MSA Information")
Me.Close()
End If
Next
'If no data sets exist, display a message.
Else
MsgBox("There are no data sets on this map. Please import your data and try again. ", MsgBoxStyle.ApplicationModal, "Get MSA Information")
MPApp = Nothing
Me.Close()
End If
End Sub
Private Sub ButtonCreateList_Click(ByVal sender As System.Object, ByVal e As System.EventArgs) Handles btnCreateList.Click
'On button click, if the user selected a Pushpin set in the drop-down
'list, use it. If not, prompt the user again.
Try
If ComboBoxDataSets.Text <> "Select a pushpin set" Then
SetName = ComboBoxDataSets.Text
Pins = Map.DataSets.Item(SetName)
CreateList()
Else
MsgBox("Please select a Pushpin set.", MsgBoxStyle.Exclamation, "Get MSA Information")
End If
Catch ex As Exception
MsgBox(ex.ToString & " on record number " & n - 1, MsgBoxStyle.Exclamation, "Error getting data")
Finally
End Try
End Sub
Setting the Zoom Level and Map StyleDifferent location types are displayed at different zoom levels of the map. For example, if you view a map at a high zoom level, less detail is displayed. As you zoom in, you see more city names, parks, roads, and so on. MSAs are consistently available at a zoom level that is equal to an altitude of 15 miles and when the map style is set to Data Map. To be able to retrieve the data we're looking for, we'll set the map to that zoom level and style before calling the ObjectsFromPoint method. First, however, we'll determine the current map style, altitude, and location so that we can change the settings back later. Note Remove the comment character from the MPApp.Activate statement in the following code if you want to bring MapPoint to the foreground to watch it search. Private Sub CreateList()
Center = Map.Location
Style = Map.MapStyle
Alt = Map.Altitude
'MPApp.Activate()
'Set the map to the style and altitude where MSAs are displayed.
Map.MapStyle = MapPoint.GeoMapStyle.geoMapStyleData
Map.Altitude = "15"
On Error GoTo ErrorHandler
Calling ObjectsFromPoint and Writing Data to ExcelNext, we'll iterate through the Pushpin set, calling ObjectsFromPoint for each Pushpin, looking for object type 10. If a Pushpin doesn't have an object type 10 at this zoom level, it's not in an MSA. If the Pushpin is in an MSA, we'll send its name and the MSA it's in to the Excel workbook. If a user-defined Data Map (shaded areas, charts, sized circles, and so on) exists in the current map in addition to Pushpin sets, a DataMap object is returned as an object of a Pushpin if the DataMap object and Pushpin touch. But because a DataMap object does not have a location type, it will throw an error. We'll skip DataMap objects by using the Case Nothing statement in the following code. 'Keep track of the what is being sent to Excel.
Row = 1
Dim RS As MapPoint.Recordset = Pins.QueryAllRecords
RS.MoveFirst()
Do Until RS.EOF
n += 1
RS.Pushpin.Location.GoTo()
RS.Pushpin.Select()
FindResults = Map.ObjectsFromPoint(Map.LocationToX _
(RS.Pushpin.Location), Map.LocationToY(RS.Pushpin.Location))
'ObjectsFromPoint gets all the location objects for these x and y 'coordinates of the Pushpin location.
For Each Result In FindResults
Select Case Result.type
Case Nothing
Exit Select
Case Is = 10
If Row = 1 Then
'Set up the Excel worksheet in order to enter data.
ExcelApp = New Excel.Application
ExcelApp.Workbooks.Add()
ExcelSheet = ExcelApp.Worksheets.Item(1)
ExcelApp.Visible = True
ExcelApp.UserControl = True
End If
Row += 1
ExcelSheet.Cells(Row, 1).value = _
RS.Pushpin.Name
ExcelSheet.Cells(Row, 2).value = Result.name
End Select
Next
RS.MoveNext()
Loop
'Add header information to the Excel worksheet if records exist.
If Row > 1 Then
ExcelSheet.Cells(1, 1).value = "Name"
ExcelSheet.Cells(1, 2).value = "Metro Area"
End If
ErrorHandler:
'MsgBox(Err.Description & " on record number " & n - 1,_ MsgBoxStyle.Exclamation, "Error Getting Data")
Resume Next
Me.Close()
Resetting the Map Style and Zoom Level and Displaying ResultsOur last steps are to set the user's map back to the original style and zoom level and indicate how many Pushpins were in MSAs. MPApp.Activate()
MPApp.ActiveMap.MapStyle = Style
MPApp.ActiveMap.Altitude = Alt
Center.GoTo()
Select Case n
Case 0
MsgBox("No Pushpins were found in this data set. ", MsgBoxStyle.Information, "Process Complete")
Case 1
Select Case Row
Case 1
MsgBox(n & " Pushpin was checked, it is not within an MSA bounds. ", MsgBoxStyle.Information, "Process Complete")
Case 2
MsgBox(n & " Pushpin checked, it is in an MSA. ", MsgBoxStyle.Information, "Process Complete")
End Select
Case Else
Select Case Row
Case 1
MsgBox(n & " Pushpins checked, none were in MSAs. ", MsgBoxStyle.Information, "Process Complete")
Case 2
MsgBox(n & " Pushpins checked, 1 was in an MSA. ", MsgBoxStyle.Information, "Process Complete")
Case Else
MsgBox(n & " Pushpins checked, " & Row - 1 & " were in MSAs. ", MsgBoxStyle.Information, "Process Complete")
End Select
End Select
End Sub
End Class
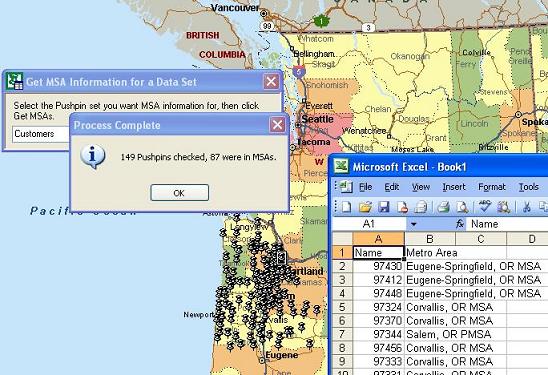
Click on the thumbnail to view the full image. ConclusionWith the Get MSA information add-in, you can use the MSA information provided by MapPoint for business planning and analysis. Although this add-in uses the ObjectsFromPoint method to search for the location type MSA for each Pushpin, you can modify the add-in to return any of the location information objects available in MapPoint, such as city, state, ZIP Code, or country. Remember that all location types are not displayed at all levels of a MapPoint map, so make sure that the map is at a zoom level where the location type you want is displayed before calling ObjectsFromPoint. For more information about MapPoint location objects that you can access through the ObjectsFromPoint method, see the MapPoint Help topic, GeoShowDataBy values. For more information about programming with MapPoint, visit the MapPoint Developer Center on MSDN. Laura Cramb is a software test engineer in the MapPoint Product Group.
 Author: Laura Cramb Author: Laura CrambEmail: lcramb(AT)microsoft.com URL: http://www.microsoft.com Laura Cramb is the Software Test Lead for the MapPoint and Streets & Trips desktop applications. She has worked at Microsoft for over six years and has spent the last four years working in the MapPoint Business Unit. Her friends and family are quite amused at her choice of product groups as she was born with absolutely no sense of direction. According to Laura, �Who better to test map software?� Laura is a Canadian raised in California where she earned associate degrees in Business and Computer Science.
|
|
||||||||||||||||||||||||||||||||||||||||||||||||||||||||||||||||||
|
|
||||||||||||||||||||||||||||||||||||||||||||||||||||||||||||||||||||


