 |

|
|
|
Building an Animated Map with Flash Demo BuilderJohn Meyer shows how to create an animated Flash map using MapPoint and Flash Demo Builder. This can be used for demonstrations and allows interactive capability with the map.
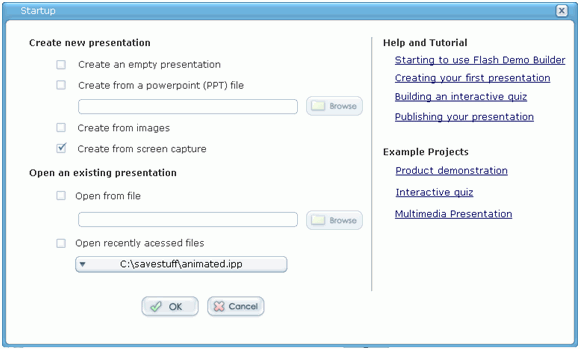
Flash Demo Builder program is very easy to learn and use and the price is a very reasonable $99.99. While Iíve created this demo of driving directions showing a car traveling to a specific location the possibilities for uses of this program are many. Tutorials would seem to be the original purpose of such a program but when combined with Map software such as MapPoint now you are just showing off! This program comes with demos of its own to get you started with your first project and it really is very easy to create demo from scratch. I started the Flash Demo Builder program and choose New Presentation | Create from screen capture

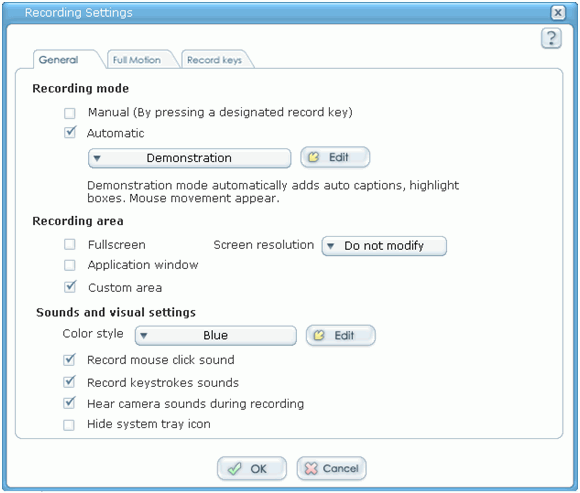
After clicking on "Ok" choose manual or automatic recording. If you choose manual - every time you want the screen to appear in your presentation you press the Print Screen Key. If itís set to automatic - every time you click the mouse on your screen it will record or capture the screen. I choose manual for this demo because I will move the car on the man then choose to capture the screen.

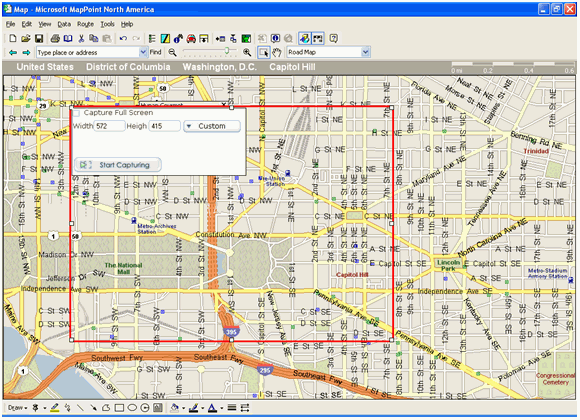
Notice I choose "Custom Area". Click ok and the next screen allows you to adjust the size and location of the captured area. click start capturing to begin.

I positioned my car at the start point and pressed "Print Screen". I then moved the car a bit and repeated the print screen step. When you are done there is a little icon in the system tray to click and you will return to the flash demo builder. It will ask if you would like to add the captured images - click yes.

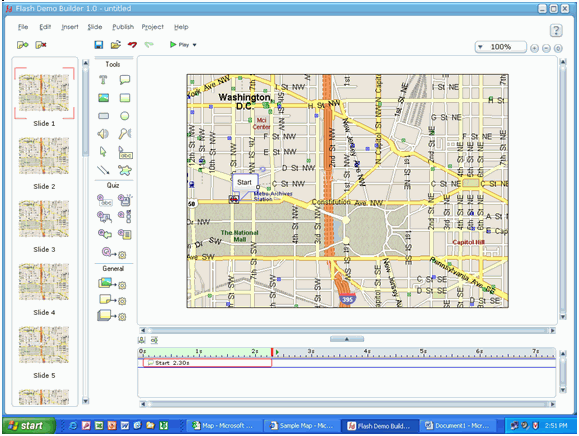
Now you are ready to add Callout balloons with text and adjust the speed of things. Notice the "Tools Menu" Drag out a callout balloon and place it where you like. Double Click it to change the text and you may also set actions to take if clicked. I like the fact that you can go to a website if clicked! At this point you can add slides, delete slides etc.. I added a callout and a 3 second delay at the point I made the car turn left. At the end of the route I added a callout that explained I was at the destination and paused the presentation at that slide. The callout - when clicked will advance to the next slide which is a zoomed in screen shot of the map. You can publish you demo to HTML / Flash, an EXE file, DVD, Autorun CD-ROM, Movie file and more. You can even export to Microsoft Word.
View my short demo here:
For more information on the product visit the Flash Demo Builder web site: Hope this gives you some ideas on how you can leverage this neat tool.
 Author: John Meyer Author: John MeyerEmail: john(AT)support-pc.com URL: http://www.support-pc.com John is a software developer and Network Engineer who has written several MapPoint applications and utilities most notably the "Pushpin Tool". Other programming projects usually include VB and VBScript tools for Network Administrators.
|
|
||||||||||||||||||||||||||||||||||||||||||||||||||||||||||||||||||
|
||||||||||||||||||||||||||||||||||||||||||||||||||||||||||||||||||||


