|

|
|

|
MapPoint and Visual Studio 2010 TutorialWilfried Mestdagh shows how to get started with Visual Studio 2010 and MapPoint 2010 development in this first of a two-part article.
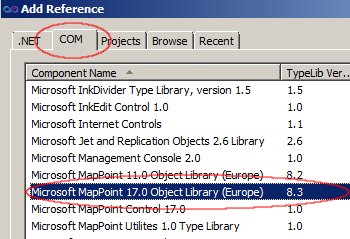
Getting Started with MapPoint in Visual Studio 2010Part 1: Using the object modelWilfried Mestdagh's article shows how to use MapPoint in Visual Studio 2010.Sometimes people think MapPoint's architecture is getting dated and has difficulties working with modern development tools. Well, nothing is less true. Every modern development tool is perfectly suited to do development with MapPoint. This article is a small tutorial on how to start with MapPoint in VS2010, using the object model. This article assumes you have installed Visual Studio 2010 and MapPoint 2010 (or any other version). We start the development tool and create a new windows forms application. First thing to do is to add the MapPoint type library to our project. To do this click right on 'References' in the Solution Explorer and then click 'Add' as shown below:
Next click the tab 'COM Components', then 'Microsoft MapPoint Control 17 type library' as shown below, then click 'OK'.
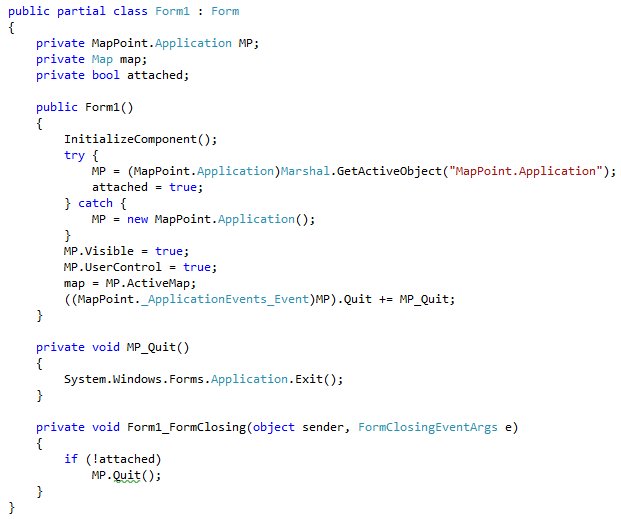
Now we add a few 'using' clause as shown below and then we can start:
Now we start coding a little. What it does is the following:
Special notes:
Now you are ready to code and let MapPoint do exacly what you want for your application. Happy coding :)
 Author: Wilfried Mestdagh Author: Wilfried MestdaghEmail: wilfried(AT)mestdagh.biz Wilfried Mestdagh works as software engineer at the company Sonal in Mortsel, Belgium. His main work is writing software for fleet management and onboard computers. Fleet management is mainly written in Delphi and C# while the onboard computers are mostly programmed in C. His department started years ago for specializing in tracking and tracing security and dangerous transport vehicles, but it is grown to satisfy a very wide of vehicle / truck fleet customers.
|
|
||||||||||||||||||||||||||||||||||||||||||||||||||||||||||||||||||
|
|
||||||||||||||||||||||||||||||||||||||||||||||||||||||||||||||||||||